Wednesday, March 27, 2013

New Workshop!


Most of my activity is now above ground level in the loft of our new house:
 
 
Almost everything is now unpacked and situated. A lot of work (and head scratching) went into getting this space set up for efficient work and tool storage, as it is completely different than my previous shop.  It's great to have natural light and an open ceiling. 


Tuesday, June 28, 2011

Making A Bridge With Hand Tools


no electrons sacrificed...

The classical guitar bridge is pretty simple: just a  rectangular piece of wood with some longitudinal grooves.  It's a pretty straightforward procedure with a table saw and/or router table - once the machines are properly set up you can run a lot of wood through and make many bridges in fairly short order (although it still requires some hand work). 
 However, you are no doubt asking yourself:  "how would Roy Underhill make a guitar bridge?"  Not to mention: how did Antonio de Torres, Manuel Ramirez, Santos Hernandez, et al. make their bridges?  (If any of these names are unfamiliar to you, please Wikipedia them.)  
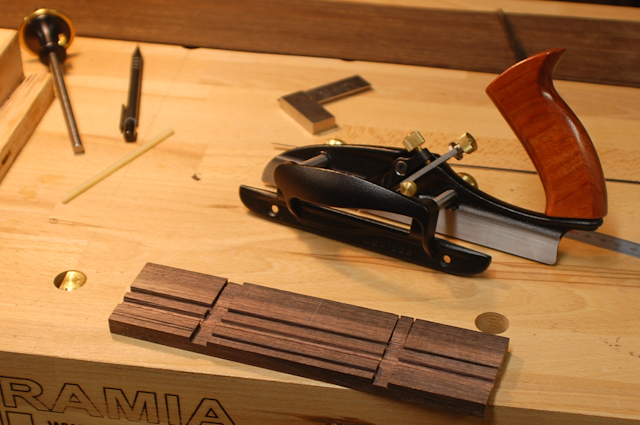
The common thread there is the use of hand tools only.  Here are the tools I used to make the bridge in this post:


And here are the raw materials; a hunk of Indian Rosewood, a piece of bone, and a couple thin strips of veneer of contrasting colors:


The bridge can be thought of as two sections: the center part with the tie block and saddle, and the sides, or outer "wings".  While there are many ways to proceed, on this bridge I'm first separating the center part from the wings. The wings are lower than the center, so I'm creating a space to either side that will allow work on the center part of the bridge. 


I used a plow plane to create these grooves, but other tools could be used to achieve the same result.


 A fret saw is used to remove a couple this strips from the piece of bone.  These will be inlaid around the tie block.  Besides being decorative, the bone inlay prevents the strings from digging into the wood.  The thin veneer strips will be glued to one side of the bone strips - not necessary but looks nice.  The piece of bone that's left will be used for the bridge saddle.


  The excess width is sawed off using my indespensible custom-made Mike Wenzloff small rip saw.


The bone strips have been glued into a small recess around the tie block.  The corners are mitered, and it took a while to get the fit good!


 Shaping the wings and the ramp behind the saddle...


The string holes have been drilled (with the eggbeater drill) and some finish applied (oil varnish in this case).


 Here are a couple completed bridges, one showing how the bone saddle fits into place (of course it is only roughly shaped at this point).


Monday, June 27, 2011

Closing the Box


Meanwhile, Back to the Back...

The back braces have been radiused and are glued onto the back in a 'dish' of the same radius as the braces.  Since the back is so thin (approx. 2.3 mm) it will easily hold the curved shape after the glue dries, and a domed back is achieved.


Shaping the braces after they have been glued on...  This shows a carved brace (on the left), carving in progress (middle), and one not yet touched.


Ah, it occured to me that before the back can be attched, there must be some sides to attach it to.  I'm using a different method to bend the sides than the previous guitar (documented earlier in this blog), in which the side was pressed into a mold.  Here, a 'bending iron' is being used - the bending is done by hand, holding the wood against the iron until it is hot (and pliable) enough to bend.  While bending, the side is frequently referenced to the template to make sure it is shaped correcly.


 It's also important to check to make sure that the side does not develop a twist as it is bent, so it is frequently checked for square.


  Fast forward a bit, the sides have been installed into place, and the linings and tail block added.  Also (and very importantly) since the back is radiused, the linings, tail block, and foot have all been shaped to accomodate the radius of the back so everything fits nicely.  Oh, one more thing - you can make out small notches carved out of the lining (three on each side) - the back braces sit down into these notches.  OK, it's ready for the back to go on!


 The back is glued up and clamped.  This is the 'face down' method of assembly, which while having it's advantages, has the disadvantage of not being able to access the inside of the guitar through the sound hole to remove any squeezed out glue (before it dries).  When using this method, you have to be careful to get enough glue in the right places, but not so much that it creates globs of squeezed out glue inside the guitar (most unsightly).


Whew, clamps removed and a successful back glue-up.  Looking through the soundhole, you can see where the back brace fits into the notch.  Fortunately, you don't see (much) glue squeezed out...


 At this point it starts to look like a guitar! 


Next post: Making a bridge with hand tools.


Saturday, February 5, 2011

Progress On Two New Guitars


Completing the Soundboards


The 7 fan braces have been glued on and are then carved to shape.  These braces need to be carved before other the braces can be glued on.


Now, the braces are all in place and carved.  This photo shows the three planes I use for shaping braces.  I also use a paring chisel.


This is the other guitar-in-progress at the same stage.


Here are the completed tops with their backs.


The necks have been glued on and now.


Front view.  Now it is time to start working on the sides.  (LOTS of planing.)

Thursday, December 16, 2010

Two New Guitars Started


Beginning Two Guitars of Divers Types

Two guitars are currently underway.  The top (soundboard) and the back of each has been joined, dimensioned and inlaid.  The photo just below shows a Hauser-style guitar that will be similar to the guitar documented earlier in this blog.  Same woods, as well: Italian Alpine spruce for the soundboard and Madagascar rosewood for the back.

Picea abies, Dalbergia Baronii

As you can tell in the next photo (below) the woods are different and the shape of the guitar (plantilla) is also different.  This is a new style for me, and while not based on any single instrument, it borrows design elements from guitars made in Spain beginning in the early 1960's in the shops of Ramirez, Rodriguez, Fleta, etc.  These guitars are characterized by a deep, full sound that can be dark and soulful.  The woods chosen here are Western Redcedar, and Wenge from Africa.  Western Redcedar (not a true cedar, actually in the cypress family) is not a traditional soundboard wood; Jose Ramirez III began using it in the early 1960's (I believe) and it became an essential element in the characteristic sound of his instruments.  Wenge, an African tree, is an alternative to the traditionally used rosewoods that are now endangered, unavailable, and/or too expensive. 

Thuja Plicata, Milletia laurentii

The soundboard bracing is shown below.  On the left is the Hauser style (symmetrical 7 fan braces)  This style actually goes back to Torres in the mid 19th century, and has been used by many, many guitar makers incorporating their own subtle tweaks as did Hauser.  On the right is what I will refer to as the "Madrid" style, as that is where Ramirez worked, but the style is not limited to Madrid.  A characteristic of this style is asymmetric bracing with almost any number of fan braces.  I'm using 7 here, but the great Spanish luthiers have used 5, 6, 7 or 9 fan braces to help achieve the sound they were after.  My bracing (below) is actually a very conservative design and still very close to Torres with only the diagonal strut to create the asymmetry.  The creativity and skill of the Spanish luthiers who started this style was/is amazing, and some complex and intriguing bracing systems have been devised.  I'm playing it pretty safe here...


Each guitar model requires its own work board (solera), which you can see below in the background.  The dimensions of the solera match the design of the guitar soundboard, including the dished out lower belly of the solera which creates the domed soundboard.


Here, the dimensioned braces are shown on the 'blueprint' for the guitar.


Check back to see how things progress!


Saturday, November 20, 2010

The Completed Guitar


Finished!


Well, pretty much finished...  I still need to do a bit more French polishing, but the good thing about FP is that you can always add more at any time (which is a good thing as it wears easily).


Sloane tuning machines.


This is a Humicase with a built-in humidification device.


Each guitar is an individual, you can never make two guitars exactly alike.  I think this one turned out well, but it's an evolutionary process: you learn with each guitar, and apply what you learn to the next one.

Thanks for looking at my blog!


Tuesday, August 31, 2010


Finishing (French Polish)

It's been a while since I updated the progress on this guitar.  I've been working on other guitars while working on the the pore filling and finishing of this guitar.   

First, a little background.  Most hardwoods have open pores (open voids in the grain) that need to be filled with something in order to achieve a level surface, and a smooth final finish.  This particular guitar is Madagascar rosewood (Dalbergia Baronii) which has long, deep canyon-like pores.  There are numerous ways to fill pores, but it is usually time consuming, messy, and the least fun part in the guitar making process.  (It should be pointed out that pore filling is optional, but generally expected.)  Many guitar makers now use an epoxy finishing resin to fill pores, which has many advantages: it is clear, so it takes on the color of the wood it's filling, it enhances the contrast and depth of the wood grain, and, compared to most other methods it's easy to use (although it can be toxic to those who have a sensitivity to epoxy, which can pop up at any time). 

For this guitar, I decided to use an old, traditional method of filling: pumice (ground volcanic dust).  A pumice and French polish finish uses minimal materials, no chemicals or toxic substances, and when done well creates a beautiful, organic looking finish.  It is also very labor intensive.  Filling the cavernous pores of this wood with pumice has turned out to be a journey in itself, involving a lot of backtracking, research and trial & error.  As the pictures show, the back and neck of the guitar have been filled and French polished (a method of applying shellac by rubbing it on in micro-thin layers with a pad).  I'm still working on filling the sides of the guitar.  Thank goodness the top (spruce) is not an open pore wood and doesn't need to be filled.

Filling the pores involves rubbing pumice into the wood using a pad, alcohol and a bit of shellac.  The details of the process differ with each practitioner, and the scant literature on the subject is rife with contradiction.  As previously mentioned, a lot of trial & error was involved.


The next post will show a mostly completed guitar, with a little more detail about French polishing.